 by
by 
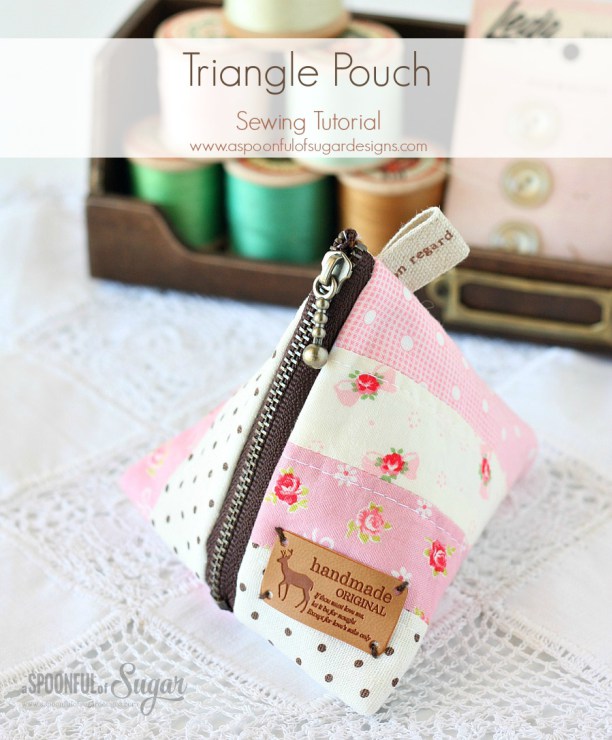
2014 has been a great year for A Spoonful of Sugar and we have had so many lovely opportunities as a result of our blog! We are so grateful to our lovely readers for your wonderful comments and support. As a thank you for visiting us throughout the year, we wanted to share a final sewing tutorial for 2014. If you follow us on instagram, you will have seen our little Triangle Pouch that we made last week.

These little triangle pouches are fun to make and are perfect as small coin purses, to hold make-up essentials, or a few sewing supplies. Made from four strips of fabric, they are quickly assembled and make great little gifts. The fun part is choosing four co-ordinating fabrics. Be warned, it is hard to stop at one! The 10 cm (4 inch ) zippers were purchased in Japan a couple of years ago. Unfortunately I only had two zippers in my stash. If you search for antique metal zippers on Etsy you should be able to find some similar metal zippers or any 4 inch zipper would do.

The inspiration for this triangle pouch came from a recent issue of the Japanese Magazine, Cotton Time (sadly we don’t read Japanese so we made our own interpretation). Our version has a number of differences including size, construction technique, and patchwork.
Materials:
- 4 strips of cotton or linen fabric, measuring 1 1/2 inch x 9 inches (patchwork pouch exterior)
- rectangle of cotton fabric, measuring 8 1/2 x 4 1/2 inches (lining)
- length of ribbon, measuring 2 inches x 1/2 inch wide
- fusible wadding such as parlan, measuring 9 x 4 1/2 inches
- small leather label (optional)
- 4 inch metal zipper
Finished Size: 4 inches across the front edge x 4 inches along zipper opening.
Method:
1. Stitch the four patchwork strips together to make a rectangle measuring 9 x 4 1/2 inches. Press the seams open. Press the fusible wadding to the wrong side of the patchwork panel. Using a stitch length of 3.5, stitch through both layers 1/8 inch from each seam.

2. Cut the patchwork panel in half so that you have two squares measuring 4 1/2 x 4 1/2 inches. Rotate one square 90 degrees and then stitch the squares together along one edge. You will now have a rectangle measuring 8 1/2 x 4 1/2 inches. (Refer to photo below).

3. To install the zipper we used the same technique that we used in our Pencil Case construction. This is an easy method for inserting zippers. Check out our pencil case post for more photos if you are unsure of the technique. Place the zipper face down on the left hand edge of the patchwork panel so that the edges are aligned. Baste in place. Place the lining panel face down on top of the patchwork panel. Stitch along the left edge using a 1/4 inch seam allowance. If you open it up, it should look like the photo below.

4. Bring the remaining patchwork edge over to the other side of the zipper and base in place. Bring the remaining edge of the lining around to the other side of the zipper so that all the edges are aligned. Stitch along the edge using a 1/4 inch seam. It should look like the photo below.

5. Open the zipper and turn the pouch out the wrong way.Centre the zipper along the bottom edge as shown. Stitch a 1/4 inch seam along the bottom edge and trim the excess part of the zipper. Overlock (serge) or zigzag the raw edges. My overlocker was packed away as we have a guest staying in the sewing room, so I used a small zigzag stitch to finish the raw edge. If you don’t like to have an exposed edge inside your pouch, you could cover it with a length of bias tape to hide the raw edge.

6. Turn the pouch out the right way. Fold the small piece of ribbon and baste it to the top edge as shown in the photo below.

(Optional) Add a small patch to the front of the pouch if desired (Refer to photo below). We bought the patch from Etsy seller Sonsu.

7.Turn the pouch out so the lining is showing. Fold the top edge so that the end of the zipper is on one side. Pin and then stitch along the opening. Zigzag or serge the raw edges as shown in the photo below.

Turn the pouch out the right way, and it is ready to use.


You can check out our patchwork Triangle Pouch Variation here.