 by
by 
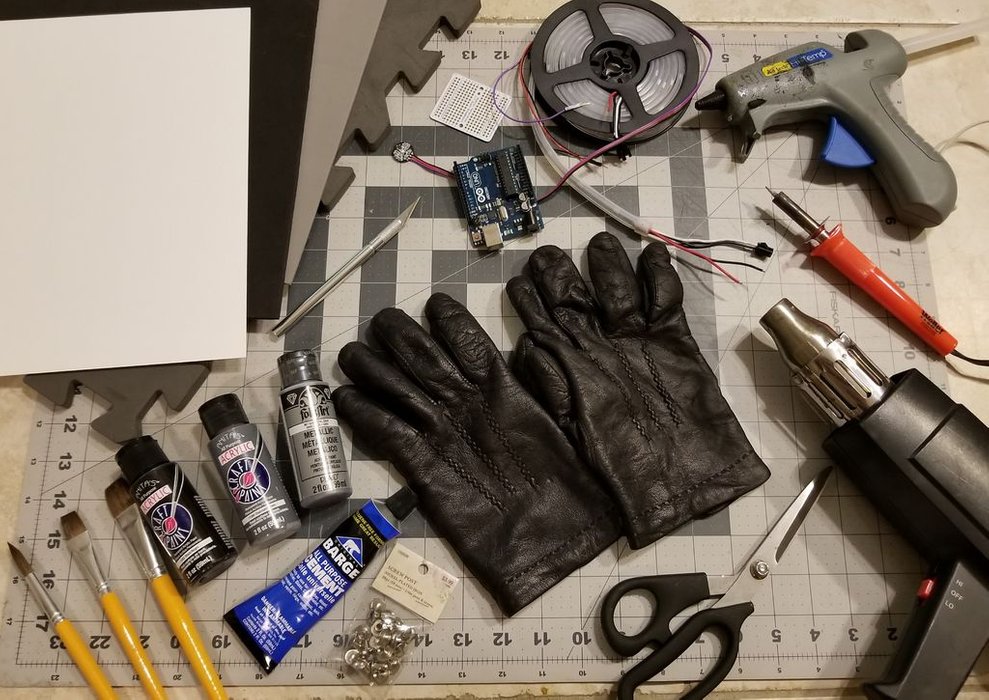
Materials Needed
Arduino Uno– Microcontroller that will interpret incoming data and house our code
Pulse Sensor– IR sensor that reads changes in blood pressure through the skin
Adafruit Neopixel Strips– These will serve as the display method for our heartbeat
16g Wires– These will be soldered onto the neopixel strips and connected to the Arduino
USB 2.0 Type B Cord– This will connect the Arduino to the power source. A short one comes with the Arduino board, however for this build I used a longer one.
Portable Phone Charger– This will be the power source
Soldering Iron with interchangeable heads, and solder– Used to fuse our electrical components together, and to add some texture and detail to the armor
Heat Gun– Used to shape our building material
Poster Board / Cardstock- Used to make templates for the armor
EVA Foam- The building material; we’ll need 2mm, 4mm, and 1cm thick foam
Plasti-Dip Spray– This will prime our foam for painting
Acrylic Craft Paint- I used black and metallic paints for maximum *e d g e*, use what you see fit
Leather Glove– Will be used to hide our pulse sensor
Stretchy Nylon Straps– used to hold the armor in place
Chicago Screws– will hold straps and articulated parts together
Hot Glue + Gun– Will insulate some of our soldering, and hold the neopixel strips in place
Barge Contact Cement– The best adhesive to use when heat forming foam
Step 1: Planning


Find Inspirations- Mine were Medieval-Gothic armor and bioluminescent deep sea fish
Diagram- draw what you imagine the finished product to look like and how it is intended to work
Make templates- This project focuses more heavily on the form factor over the electronic complexity, so take the time to measure your proportions so that your armor fits and looks good. If you find this is difficult, there are plenty of free foam armor templates and tutorials online. *Prototyping is also an option; this is where you make smaller scale versions of various parts to see if it can make the desired shape.
Step 2: Electronics and Code


Before using the code provided, ensure you download the libraries associated with the pulse sensor and neopixels in the Arduino application. This can be done by going to Sketch > Libraries > Manage Libraries > … and searching for “pulse sensor” and “adafruit neopixel”
If you would like to learn more on using Neopixels, I suggest checking out this link
The code I used is built upon the ‘simple’ sketch provided in the Pulse Sensor library, with code that makes the neopixels compatible with it.
Step 3: Foam-smithing


Setup-
Trace templates onto your foam, either holding them in place with your hands or with pins.
Carefully cut out what you traced, though keep in mind the angle of the cuts determines what shape the foam takes when glued together
Cut divots out of the backside of the foam where you want the pieces to bend
Coat a thin layer of contact cement in these divots and where the foam will connect to other pieces. Let this layer cure for 15 minutes, or 5 minutes after a quick pass with a heat-gun.
Smithing-
Carefully connect the cemented areas, then see if it holds. If it does, use the heat-gun on the low setting to make the foam bend more smoothly. If using thicker foam (1 cm), use the high setting, gently passing the gun along the surface.
Once desires shape is formed, pass the heat-gun (on its low-setting) along the front-side of your foam parts. When you see the matte texture of the foam turn glossy, the foam is considered ‘sealed’. This will give the foam a smoother surface form priming and painting.
Add texture and personality to your armor by using the wood-burning tool. They typically come with interchangeable heads, giving you the ability to make various texture types. I wanted my armor to look like it was made of scales and claws, so I burnt lines in logical places to add this effect.
Make sure your parts fit, as they may end up looking or fitting differently from your templates.
Step 4: Finalizing- Prime and Paint the Foam Parts


Ensure that the pieces have been heat sealed (check step 2). If they are sealed, take them to a well ventilated location or outside and spray them down with Plasti-dip. I personally like this stuff because it is flexible and is easy to paint on.
Follow the instructions on the back and spray your foam pieces down with an even coat. If there are thin areas, give them a gentle spritz. Let dry for 30 minutes in warm temperature or an hour in cooler temperature.
After this, use acrylic craft paint. Darker colors often go down first as a base coat, then lighter as you build up the surface of the foam. I like to add light weathering to my stuff, so lightly brushing on silver paint where logical wear and tear is can add a lot to the look of your armor.
Step 5: Finalizing- Attach Electronic Components


Determine where you want to place the neopixels. For me, I wanted light to emit from the slats in the gauntlet’s plating, so i marked these spots on the base.
Where I marked, I cut neopixel strips that fit in that space, cutting holes above them for the wires to go under.
I attached a piece of velcro to the part that goes around my upper arm, and a piece to the underside of the Arduino. I cut a hole under this area for the wires to go and attach to the neopixels on my forearm, and for the pulse sensor to reach my hand.
Step 6: Finalizing- Make It Wearable


Now, that all the pieces are in place, it is time to make it wearable. Due to the nature of my design, the only place that needed some help was my forearm, as the armor around my upper arm fit nice and snug.
I want to ensure maximum durability, so instead of relying on glue that has failed on me in the past, I decided to use both hot glue and Chicago screws to hold my elastic nylon straps in place.
I scored the backside of my foam base with an x-acto knife (cutting x marks). I then measured the proper length I needed for my straps and cut them out. I applied a layer of hot glue to the scored areas and quickly pressed the ends of straps to them. I waited for the glue to dry, and then pushed my x-acto’s blade through the strap and foam, inserting a Chicago screw into the hole to hold it in place.
I added the hand plate onto the back of my leather glove by applying a thing layer of contact cement on both the desired areas of the glove and backside of my armor. Once the adhesive cured, I pressed the glove and armor together for them to stick permanently.
Finally, provide a power source. I used a portable phone charger and attached it via a USB 2.0 Type B cord that was long enough to be tucked away under my sleeve and into my back pocket where the battery resided.
Step 7: Now, Its Ready to Wear!